
Introduction
Quick Navigation
After a long time, car batteries fail in quality only because their content had undergone chemical reactions against their functionality. Most times, the electrolyte undergoes sulfation, becoming acidic and dangerous to the battery. When that happens, you don’t always have many options on your hand. In some circumstances, you could be asked to get a new battery; in others, reconditioning the battery may seem to work.
Before today, most people didn’t know reviving a dead battery was a thing; however, this article says it is possible. If you need a DIY on how to recondition car batteries, you are in the right place. With the right equipment and materials, you could easily do that and preserve the lifespan of your battery.
Questions
What Does Reconditioning a Car Battery Mean?
The process in which a dead battery is brought back to life – healthy with good charging potential, is called Reconditioning. It is a cost-efficient way to re-use old batteries for automobiles, especially cars. A reconditioned battery may not be as effective as a new one, but it helps save money and reduce waste.
Read more on how to recondition and fix dead batteries with Epsom Salt
What Do You Need for Car Battery Reconditioning?
Reconditioned batteries always have a different electrolyte as a replacement for the old one. A common ingredient used in making such an electrolyte is Epsom Salt. However, that is not enough to complete the task; you will need various materials to get started. Interestingly, some of these materials are often within the home, so you could easily make a DIY electrolyte without spending too much.
Check out the following list of materials/equipment.
- Protectives, such as Apron, Goggles, Mask, and Gloves
- Baking Soda
- Distilled Water
- Bucket
- Funnel
- Toothbrush
- Voltmeter/Multimeter
- Battery Reconditioning Charger
- Flathead Screwdriver
What are the Steps Involved for Reconditioning Car Batteries?
Everything you need to start the reconditioning process should be on stand-by; if they are, begin with the steps below.
Remove the Battery
Firstly, gain access to where the battery is before doing anything else. Depending on the mechanism your car uses, pop the hood open to see the battery. It would be best if you didn’t rush to do anything; assess the situation first and be sure the battery is removable. If there is no warning about removing the battery, then you can proceed. Remove the cover first and use a flathead screwdriver to remove the cable. Start with removing the negative terminal before the positive terminal. Once the battery is free, remove it gently and place it over a flat surface.
Pour the Old Electrolyte Away and Neutralize the Cells
Since the battery is out in the open, expose the cap and pour the content – old electrolyte, into a bucket. Make a Baking soda solution with water to neutralize the acidic electrolyte in the bucket. Likewise, pour the solution into the cells and dispense the content after some minutes – repeat at least twice.
Prepare a New Electrolyte
During that period, you are waiting for the acidic environment to be neutralized and prepare the new electrolyte. In this case, the Epsom Salt solution is what works best. Add distilled water to 6 to 8 oz. of Epsom Salt and Mix. Store in a cool place until you are ready to proceed with the next phases.
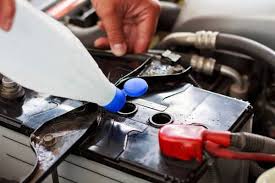
Fill the Cells with the New Electrolyte
Use a funnel to fill the cells of the battery with the Epsom Salt electrolyte. If the cells are yet to be filled due to low electrolyte, ensure you make some immediately. Within 5 to 10 minutes, all the cells should now be filled with a new electrolyte.
Secure the Caps
The most important part of everything that involves reconditioning car batteries is filling the cells with new electrolyte. Once that is done, you should return things to do the way they were. First, you start securing the caps and ensuring proper connection, i.e., red cable to the positive terminal and black cable to the negative terminal.
Charge the Battery and Test the Voltage
If you have a car battery and the voltage is above 12.6V, you shouldn’t have to worry about reconditioning. However, if the battery falls below 12.6V, up to 10V, you should consider taking this procedure.
It takes about 12 to 24 hours to charge a reconditioned battery fully. Before you do that, make sure you have a great charger that would work efficiently. The type of charger you use often determines the charging capacity and potential. Therefore, it is always advisable to go for the best brands on the market.
Return the Battery
After charging, you should put the battery on load test to further determine its efficiency. If all goes well, you should return the battery to the car. Turn on the ignition and look for changes – good or bad.
What are Alternatives to Epsom Salt Electrolyte?
Sometimes, you may not have easy access to Epsom Salt, as you thought you would; there are alternatives you could use. These alternative solutions as electrolytes offer similar benefits and potentials, so you don’t have to worry about adverse effects. They include;
- Copper Sulfate: It is a blue powder compound that dissolves immediately in distilled water.
- Aluminum Sulfate: Another compound that takes an even ratio to dissolve in water.
Can I Use Vinegar as Electrolyte?
As opposed to how effective you think Vinegar is, it is not a suitable alternative for battery electrolytes. It cannot be used because it causes a negative reaction within the cells of a battery. For instance, it forms Lead Acetate, affecting the functions, performance, and charging capacity.
Conclusion
Do you think you’ve learned something new about cars and their accessories? Of course, learning how to recondition car batteries will help in the long run. You may never see the need to change batteries when the old type gets faulty constantly with this understanding.
