Intro
Quick Navigation
Not everyone has the money to fix problems when one arises, especially those with automobiles. Therefore, people always go for alternatives. The truth is: these alternatives are not the best way to go, but if you are ever in this situation, you may have no choice. However, they don’t work all the time, so you have to be careful and expect the worst scenario.
Surprisingly, most people never knew Battery Reconditioning was a thing until recently. It is a cost-efficient alternative to maintain a battery’s lifespan when you cannot afford a new one. In this case, you will have to use a special ingredient – Epsom Salt.
While you are wrapping your head around the possibility of doing that, this article aims to teach you how to recondition and fix dead battery with Epsom salt comprehensively. Additionally, the several benefits of using this method will be mentioned below.
Find out more about reconditioning car batteries.
What are the Steps to Recondition a Dead Battery?
With Epsom Salt, you will be making an electrolyte solution; hence, you need some tools and materials. Below is a list of the essential things needed.
Epsom Salt
Voltmeter
Distilled Water
Baking Soda
Gloves
Funnel
Toothbrush
Flathead Screwdriver
Battery Load Tester
Bucket/Container
Reconditioning Battery Charger
Goggles
The availability of these materials and more means you can proceed with reconditioning the dead battery. Follow this step-by-step guide.
- Protect Yourself
For this task, your safety is of utmost importance. You need to be careful of the things you do or touch – that is why there are protectives in the materials you need. Gloves, Goggles, and Apron are three things you will need; therefore, you should wear them before anything else.
- Locate, Remove and Inspect the Battery
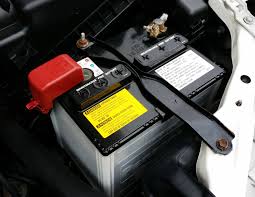
If you are properly kitted for the task, get started by checking what you have to work on – the battery. If it is a car battery, pop the hood open and locate the battery. With the battery in good sight, inspect every corner for corrosion, leaks, or swells. Most times, a dead battery becomes corroded, so you need to carry out this reconditioning method.
- Remove Corrosion
The presence of corrosion on the terminals means that the electrolyte in the battery has only become toxic. A great way to get rid of it is using baking soda. Prepare a baking soda solution with distilled water – it will look sticky and pasty. Next, dip the toothbrush in the solution and use it to remove the corrosion on the terminals. If it becomes too hard to remove, use sandpaper instead.
- Get Rid of Old Electrolyte Solution
When every atom of corrosion gets removed, the next step is to get rid of the battery’s electrolyte solution. Start by removing the battery caps with a screwdriver; then, tilt the battery sideways to dispense the solution into a bucket. This phase needs serious care so that the content doesn’t come in contact with your skin.
- Neutralize the Acid
Even after dispensing the acidic electrolyte solution, the interior is not safe yet. You then need to neutralize the acid so that it is safe to accept a new electrolyte solution. Do this by adding baking soda solution into each cell and cover with the battery caps for some minutes. Dispense the content afterward into a bucket. Try this twice for complete neutralization.
- Prepare Epsom Salt Solution
While you are handling the neutralization of the battery cells, you should prepare the Epsom Salt Solution. The procedure is an easy one: In 1/2quart heated distilled water, dissolve 7-8 Oz. of Epsom Salt, and stir.
- Fill Battery with the New Electrolyte
When the time is right, fill each battery cell with the Epsom Salt solution as the new electrolyte. Use a funnel to ensure safety and prevent wastage. If the solution isn’t enough, you could always make more.
- Cover the Battery
When every battery cell is filled, secure the battery with its caps. Keep the battery properly covered like it used to be with the old electrolyte.
- Use a Reconditioning Battery Charger
Now that you have an electrolyte, you have to power the battery and see how effective the reconditioning process was. There are reconditioning battery chargers around – all you need is to get one. They are special because they are known to power dead-now-reconditioned batteries. Connect the charger to the 12V battery and leave for about 12 to 24 hours at a slow mode of 2 amps current.
- Measure Voltage
When the time elapses, the best way to fully know that the reconditioning procedure worked is to measure the battery’s voltage. Here, you will need a voltmeter or a multimeter. A good reading will have the battery at 12.4 to 12.43V.
- Carry Out a Load Test
Finally, placing the battery on a load test will help you determine its efficiency.
What are the Benefits of Reconditioning a Battery?
Fixing a dead battery seems like a lot of work, but it’s not if you have everything you need. It shouldn’t take you more than a day to get a car battery up and working again. However, most people don’t understand why reconditioning is important, so here is a list of the benefits.
- It saves money. Instead of buying a new battery, you could recondition a dead battery, so it picks up from where it stopped. It isn’t always a reliable method, but it reduces huge costs on new batteries.
- Disposing of lead-acid batteries is tedious, especially as it doesn’t reduce waste management. However, if a method ensures the battery works again, reducing waste should be adopted.
Conclusion
Learning how to recondition and fix dead battery with Epsom Salt is one way of becoming knowledgeable about car battery matters. The whole procedure is simple; what you need is the willingness to do it and practice safety at the same time.


