
Intro
Quick Navigation
Riding is fun until your motorcycle stops working. Have you always wondered why a bike stopped working, even when it looks like it is in great condition? If Yes, then you should know that the problem, most times, is from the battery. Preventing a situation where a motorcycle stops working means investing more time in the battery’s quality and lifespan.
Checking your battery health is not difficult, no matter how tedious it seems. Unfortunately, not everyone agrees with that; hence, this article on how to test a motorcycle battery is significant. Before doing anything with the battery, however, you need to be informed on several other things – they will also be discussed below.
What are the Types of Motorcycle Battery?
If you have a motorcycle and you would like to test the battery, the first thing you should be aware of before anything else is the battery type. Every manufacturer uses different types of batteries; however, they are categorized into AGM and Conventional Lead Acid Batteries.
- Absorbed Glass Mat Batteries
The AGM battery has a Gel electrolyte, making it seem to last longer after charging. It can withstand high storage temperatures, however, affecting the discharge rate – a faster one.
- Conventional Lead Acid Batteries
Lead Acid Batteries are the commonest type, and they exist either as Flooded or Sealed batteries. The electrolyte is liquid acid, which often needs to be neutralized with water when the levels are low. They don’t have a higher self-discharge rate as compared to the other type – AGM.
What are Battery Testing Safety Precautions?
After discovering the type of battery your motorbike has, you should consider some safety precautions before testing or charging. The reason for having this piece of information is that the battery produces hydrogen gas, which is highly flammable. Therefore, you need to be careful throughout the entire procedure.
- Stay protected with goggles, masks, gloves, and an apron.
- Work on the battery at a dry and well-ventilated location.
- Make sure the battery case is dry and clean.
- Check the battery vent tube for irregularities.
- Always inspect the battery against leaks, cracks, or swells.
How to Test a MotorBike’s Battery?
When you have everything needed to test a bike’s battery, all you have to do now is follow the step-by-step guide below.
- Inspect Every Part of the Bike
Looking at your motorbike, you could say everything is well with it until you get into the inner-workings. Going straight for the battery isn’t ideal; you should check every part of the bike for damages or unlikely conditions. If all is well, pop the seat and side-rest open to access the battery.
- Remove the Battery
Most issues with a bike’s battery are obvious – for instance, the cranking sound or dim lights are symptoms of a bad battery. If that is the issue, look for cracks or leaks in the battery before removing it. It would be great if you were carefully doing this to avoid health hazards.
- Do a Standing Voltage Test
AGM and Lead Acid Motorcycle Batteries have unique constructions, making their testing procedures quite different from each other. Irrespective of what battery type your motorcycle has, it needs to undergo a Voltage and Current test. In Voltage cases, there are two types of tests carried out – Standing and Cranking Voltage Test.
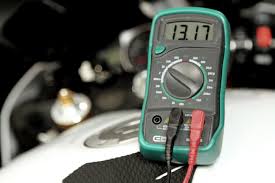
A stable motorcycle can have its battery voltage tested with a voltmeter or multimeter. All you have to do is make proper connections – the black lead to the negative terminal, and the red lead to the positive terminal. After the voltage test, if the battery ranges between 12.06 to 12.73V and higher, it is in good condition and only needs to be charged. If the battery falls lower than 12.06V, you might have to recondition or get a new battery.
- Do a Cranking Voltage Test
The second testing procedure is the Cranking Voltage Test. Here, you are putting the battery to work, i.e., allowing electric current to pass through it. If the battery is under load, use a voltmeter or multimeter to check the Voltage. While observing the Voltage, the starter should run at an average speed. If the battery is good, it won’t fall below 9.6V under 10 seconds; if not, it will.
- Do a Current Draw Test
The Current Test is the next thing you should try to do to determine the battery health. In this case, you will need a load tester to determine the amount of current passing through the battery for effective operation. However, you should know that different batteries undergo varying testing procedures; hence, follow the instruction manual on how to go about the procedures.
- Charge the Battery
Depending on the type of battery you use, get a top-tier quality charger to power the battery. Make the right connection between the charger and the battery; leave for about 4 to 12 hours. After the charging process is over, test the Voltage. If the Voltage is higher than 12.06V, the motorcycle battery is in perfect condition.
See how to charge motorcycle battery in few easy steps.
- Troubleshoot
Troubleshooting is the last part of the battery testing procedure. It means checking the battery’s activity even after charging and confirming the Voltage and current are both at the bests. If the problem persists, you may have to run few diagnostic checks to see where the problem lies apart from the battery.
Does Freezing Affect a Motorcycle Battery?
The electrolyte in a Lead Acid battery is liquid, which means it is sometimes vulnerable to freezing situations. For a fully charged battery, Freezing doesn’t affect the electrolyte; however, electrolyte mossing occurs on discharged battery due to freezing. It is marked by red lines on the battery plates, which could damage the battery extensively.
Conclusion
Getting to know how to test a motorcycle battery is a one-shot at understanding everything there is to know about your automobile. Perform the necessary things under the right condition, and there is nothing to worry about.